Host Your Own Email: Why It's Not as Hard (or Dangerous) as You've Heard
Running your own email server has a reputation as one of the worst ideas in self-hosting — guaranteed to get blacklisted, buried in maintenance, and delivered straight to everyone's spam folder. Most of that reputation is inherited secondhand, from people repeating what they read rather than what they ran. This post covers what's actually true, what actually goes wrong, and how Mail-in-a-Box handles the parts that genuinely used to be hard.
I've been running Mail-in-a-Box myself since 2015 — ten-plus users, spread across multiple domains. This isn't a "I tried it for a weekend to write a post" setup; it's mail infrastructure that's been in continuous daily use for a decade. Everything below reflects what that actually looks like in practice, not the theoretical version.
Why bother, when Gmail is free
- You own the data. No account suspension risk, no policy changes to your inbox, no company scanning your mail to build an ad profile
- No vendor lock-in on your own domain. Your email address isn't tied to a platform's continued existence or goodwill
- It's a genuinely good way to actually learn mail infrastructure — DNS, TLS, SPF/DKIM/DMARC, all the pieces that show up everywhere else in networking too
- Cost is close to nothing beyond a small VPS or a spare machine you likely already have running for something else
None of this means Gmail is a bad choice — it isn't, for most people. This is for the specific reader who wants control and doesn't mind a weekend of setup to get it.
Two ways to run this — pick the one that matches what you want
Mail-in-a-Box supports two genuinely different deployment shapes, and it matters which one you're actually trying to build before reading further:
Standard setup: everything on one VPS. If you're fine with your mail data living on a rented server rather than hardware you physically own, this is simpler and exactly what mailinabox.email's own setup guide walks through directly — a single VPS with port 25 open, one install command, done. Port 25 support varies significantly by provider, so pick carefully: Hetzner and OVH leave it open by default (Hetzner applies a brief 24-48 hour anti-abuse hold on new servers, then unblocks automatically); DigitalOcean and Vultr block it by default and require a support ticket to request unblocking; AWS and Azure block it and make unblocking difficult or effectively unavailable on many account types. Check your specific provider's policy before committing, rather than assuming any VPS will just work. If the standard setup is what you want, stop here and follow their guide instead — everything past this point in this post is specifically about the more involved alternative below, and will only add complexity you don't need.
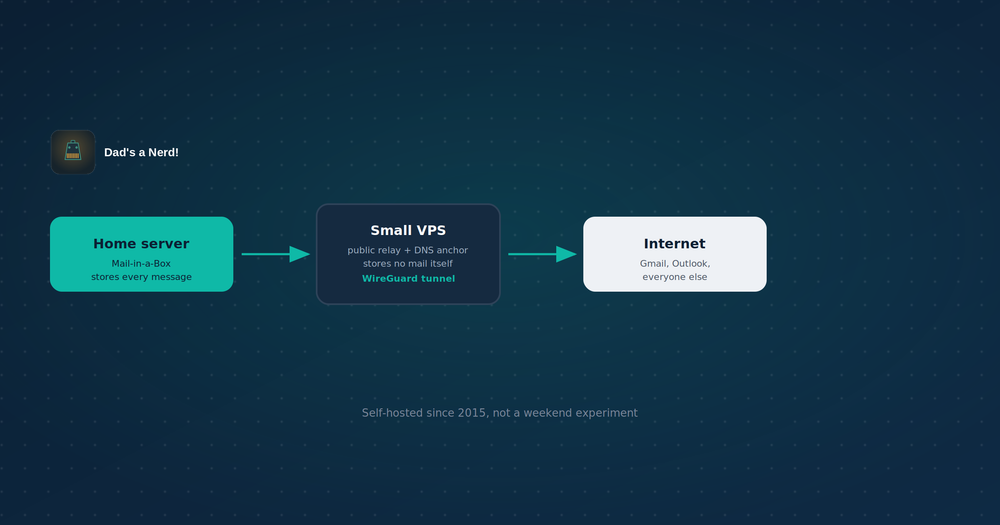
This guide's setup: self-hosted at home, VPS only as a relay. My own setup runs Mail-in-a-Box in a VM on a Synology NAS, at home, behind a WireGuard tunnel to a small VPS that exists purely to get around my ISP blocking outbound port 25. The actual mail — every message, every mailbox — lives on hardware in my house, not on a rented server. The VPS never stores or reads any mail; it just relays outbound SMTP traffic through the tunnel.
Why go to the trouble, given that the stock setup is already genuinely secure? It is — Mail-in-a-Box's default install is well-built, and I'm not suggesting otherwise. My reason for the extra complexity is narrower and, I'll admit, a bit paranoid: I don't like that a cloud provider can, in principle, snapshot the underlying disk of a running VM at any time. Mail-in-a-Box, like essentially every standard mail server, stores messages unencrypted at rest — that's not a flaw, it's how IMAP search, webmail, and normal mailbox access are expected to work, and encrypting mail at rest in a way that still supports those features is a much harder problem than it sounds. But it does mean that a disk-level snapshot on someone else's infrastructure would expose every message sitting on that disk, in plaintext, independent of the TLS protecting the connection to get there. That's a legitimate operational access a VPS provider has by design, not a hypothetical breach.
Running the actual mailbox on hardware I physically own removes that specific exposure — nobody can snapshot my NAS's disk without physical access to my house. This is a genuinely narrow threat model, and most people reading this don't need to care about it — I'm flagging it honestly rather than pretending the added complexity is required for everyone. I initially just did this to learn how to do it.
There's also a real cost advantage, not just a security one. In the standard single-VPS setup, that one VPS needs to be powerful enough to run the entire stack, and large enough for mail storage for every mailbox, spam filtering, webmail, DNS — which means enough RAM and disk space to hold years of mail for however many users you have, growing over time. In this guide's setup, the VPS does nothing but relay outbound SMTP traffic; it never stores a single message. That means it can run on the cheapest tier a provider offers, since it's doing essentially no work. I'm currently running mine on Hetzner's smallest available instance, which comfortably handles relay duty for more than ten mailboxes with room to spare. The storage and processing costs that would otherwise scale with mailbox count and mail volume stay on hardware I already own instead of showing up on a monthly VPS bill.
If it doesn't matter to you, the standard single-VPS setup above is genuinely the better choice, not just the easier one.
The Synology NAS is just what I happen to run — it's not a requirement. Mail-in-a-Box installs on Ubuntu 22.04 LTS, and that's the only real constraint. Any hardware that supports virtualization and can run a clean Ubuntu 22.04 LTS VM works identically: a Synology or QNAP NAS, a Proxmox box, an old desktop repurposed as a home server, a Raspberry Pi with enough horsepower, whatever's already running in your setup. The steps below don't change based on which one you pick — swap "NAS" for whatever your actual hardware is throughout.
The rest of this post covers the second setup.
The myths vs. what's actually true
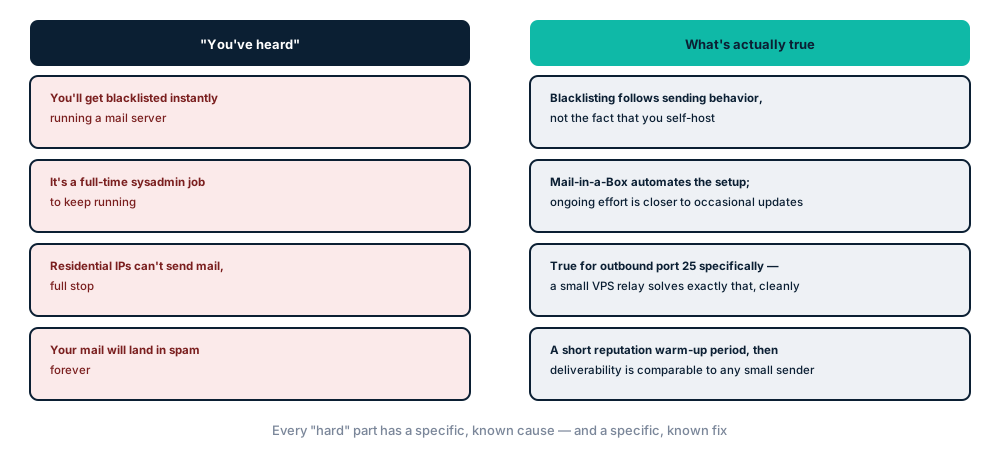
"You'll get blacklisted instantly." Blacklisting happens because of sending behavior — an open relay, a compromised box sending spam, no SPF/DKIM/DMARC configured — not because the sending IP happens to belong to a home connection or small VPS instead of a big provider. A correctly configured server with authentication records in place doesn't get flagged just for existing.
"It's a full-time job to maintain." This was truer a decade ago, when "self-hosted mail" meant hand-configuring Postfix, Dovecot, SpamAssassin, and a dozen other pieces separately, each with their own failure modes. Mail-in-a-Box bundles all of it — mail transfer, spam filtering, webmail, DNS, TLS certificates, calendar/contacts sync — into one automated install with a single admin panel. Ongoing maintenance is closer to "run the update script occasionally" than "full-time sysadmin."
"Residential IPs can't send mail." This one is actually true, but narrower than it sounds — covered next.
"Your mail will land in spam forever." New sending domains and IPs go through a reputation warm-up period with major providers (Gmail, Outlook) — a real, temporary friction point, not a permanent sentence. Once established with clean sending behavior and correct authentication, deliverability normalizes to what any small, legitimate sender gets.
The one real hurdle: outbound port 25
Most residential ISPs block outbound traffic on port 25 (the port SMTP uses to send mail server-to-server) to cut down on spam from compromised home devices. This is the actual, specific, well-documented reason "just run it from home" doesn't work out of the box — not a vague hand-wave about home connections being untrustworthy.
The fix is a small VPS acting as a public anchor point for both directions — your home server (any Ubuntu 22.04 LTS-capable hardware, as covered above) hands outbound mail to the VPS for delivery, and inbound mail also arrives at the VPS first and gets forwarded through the tunnel to the home server. The VPS exists for two reasons, not one: residential connections are usually dynamic or behind CGNAT, so they're a poor fit for an MX record even setting the outbound port-25 block aside — the VPS's stable, static IP is what your domain's mail actually anchors to, in both directions.
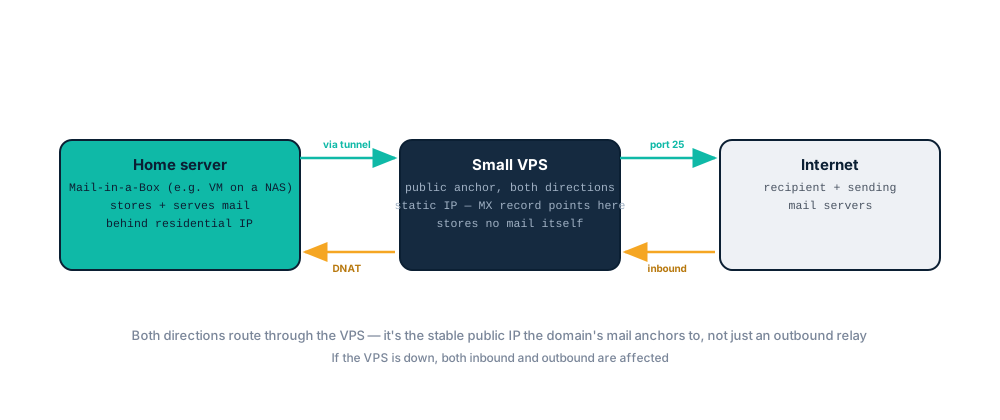
This is the same "small VPS as a stable anchor point" pattern covered in the WireGuard remote-access guide — a cheap, always-on box solving one specific connectivity problem your home connection can't, without needing to move the actual workload off your own hardware.
Check the IP's reputation before you commit
Before installing anything, check whether the IP you're about to use is already blacklisted — VPS providers reuse IP addresses, and if a previous tenant used yours to send spam, you can inherit a bad reputation before sending a single message. This applies to the standard single-VPS setup too, not just the relay pattern.
Which IP to check depends on which setup you're building:
- Standard single-VPS setup: check that VPS's public IP — it handles both inbound and outbound mail
- This guide's relay setup: check the relay VPS's IP specifically, not the home server's. The VPS is what recipient mail servers actually see as the sending source; the home server's IP never appears in outbound delivery at all
How to check:
- MXToolbox Blacklist Check — paste the IP, run the check. It queries 100+ blacklists at once and flags anything the IP is currently listed on.
- Spamhaus IP Lookup — check specifically against Spamhaus, one of the most consequential blacklists for deliverability to major providers (Gmail, Outlook, and others weight Spamhaus heavily). Worth checking even if MXToolbox comes back clean, since it isn't always included in every aggregator.
If the IP comes back listed: most VPS providers will swap you to a different IP on request if you explain why — a quick support ticket is usually enough, and this is common enough that providers expect it, not an unusual ask. Cycling to a clean IP before configuring anything is far less hassle than discovering the problem later, after mail has already started silently landing in spam.
Check again periodically once live, not just before you start — covered in Reputation and deliverability, below.
Securing both servers first
Do this before opening any ports — both boxes are about to have real internet-facing exposure (the VPS directly, the home server indirectly through the relay), and default SSH-with-password access is the single most common way a self-hosted setup like this gets compromised. This applies to both the VPS and the home server, in the same order on each.
Create a non-root user before doing anything else
Many VPS providers hand you root-only access by default — before touching SSH hardening, create a real user account to actually log in as, on both servers (skip this on either one if it already has a non-root sudo user set up):
sudo adduser yourusername
sudo usermod -aG sudo yourusername
Follow the prompts to set a password (you'll disable password SSH login shortly, but the account still needs one for local sudo use). Log out and back in as this new user before continuing — everything from here on assumes you're operating as this user, not root.
Set up SSH key authentication before anything else
On the machine you'll SSH from (your laptop or workstation, not either server) — check for an existing key, or generate one if you don't have one:
ls ~/.ssh/id_ed25519.pub 2>/dev/null || ssh-keygen -t ed25519 -C "[email protected]"
Accept the default file location; a passphrase on the key is optional but recommended.
Copy the public key to each server, to the new user account you just created:
ssh-copy-id yourusername@your-vps-ip
ssh-copy-id yourusername@your-home-server-ip
If ssh-copy-id isn't available, do it manually: cat ~/.ssh/id_ed25519.pub, copy the output, then on the server (logged in as yourusername) append it to ~/.ssh/authorized_keys.
Test key login works before touching anything else. Open a new terminal window (don't close your current session) and confirm you can log in without being prompted for a password:
ssh yourusername@your-vps-ip
Repeat for the home server. Don't proceed to the next step until both confirm key-only login works — this order matters specifically to avoid locking yourself out.
Only once key login is confirmed working on both, disable password authentication and root login, and — optionally — move off the default SSH port. On each server:
sudo nano /etc/ssh/sshd_config
Set:
PasswordAuthentication no
PermitRootLogin no
Changing the default SSH port (optional, but worth doing). This is security-through-obscurity, not a real access control — it won't stop a targeted attacker who already knows your IP and is looking for you specifically. What it does do is cut down dramatically on the constant, automated background noise: internet-wide bots scan port 22 on every reachable IP essentially continuously, and moving off it means those bots simply never find an SSH prompt to try, which means far less log noise and far fewer wasted Fail2ban bans on random opportunistic scanning. In the same file:
Port 2222
(Pick any unused port above 1024; 2222 is just a common example, not a special or safer number by itself.)
Restart SSH:
sudo systemctl restart sshd
Test again in a fresh terminal before closing your existing session — if something's wrong with the key setup, your existing session is what saves you from being locked out entirely. If you changed the port, connect with:
ssh -p 2222 yourusername@your-vps-ip
If you changed the port, update the ufw rule to match before moving to the next section — sudo ufw allow OpenSSH only covers the default port 22:
sudo ufw allow 2222/tcp
(And remove the old port-22 rule if you'd already added one: sudo ufw delete allow OpenSSH.)
Configure a deny-by-default firewall on each server
ufw ships on Ubuntu but isn't enabled by default. Set a deny-by-default posture, then explicitly allow only what's actually needed — never allow broadly and try to lock down later.
On the VPS (using the custom SSH port from above — swap in OpenSSH instead of 2222/tcp if you kept the default port):
sudo ufw default deny incoming
sudo ufw default allow outgoing
sudo ufw allow 2222/tcp
sudo ufw allow 51820/udp
Leave it at this for now — the mail-forwarding rules get added in Step 7 of the WireGuard section below, since they depend on the tunnel already existing. Don't run sudo ufw enable yet if you haven't confirmed SSH key login is working — enabling the firewall before confirming SSH access is a common way to get locked out of a fresh VPS.
On the home server:
sudo ufw default deny incoming
sudo ufw default allow outgoing
sudo ufw allow from 192.168.1.0/24 to any port 2222 proto tcp
Replace 192.168.1.0/24 with your actual LAN subnet, and 2222 with whichever port you chose above (or 22 if you kept the default) — this restricts SSH to your local network rather than exposing it to the internet at all, which the home server doesn't need since all mail traffic reaches it through the tunnel, not a direct inbound connection.
This means no SSH access to the home server from outside your LAN — on purpose. If you want to administer it remotely (traveling, away from home), don't open this port to the internet as a fix. Add a separate, narrow split-tunnel WireGuard admin connection instead — covered in the remote-access guide — which gets you into your home LAN generally (including SSH to this box) without ever exposing SSH itself to the public internet. That's a materially better posture than a port forward, even on a non-default port.
One important caveat for the home server: Mail-in-a-Box's own installer manages some firewall rules itself (for its admin panel, webmail, and local mail client access) — install Mail-in-a-Box before enabling ufw here, or check afterward that MIAB's needed ports are still reachable once you do enable it. I don't have full certainty on exactly which ufw rules every Mail-in-a-Box version adds automatically, so treat this as something to verify rather than assume.
Fail2ban, for automated brute-force protection
Worth adding on both, but especially the VPS, which is genuinely internet-facing:
sudo apt install fail2ban
sudo systemctl enable fail2ban
sudo systemctl start fail2ban
The default configuration already covers SSH out of the box — bans an IP after repeated failed login attempts. No further config needed for the baseline protection; Fail2ban's jail.local file is where you'd tune thresholds or add jails for other services later, if needed.
Automatic security updates
sudo apt install unattended-upgrades
sudo dpkg-reconfigure --priority=low unattended-upgrades
Choose "Yes" when prompted. This applies security patches automatically without needing to remember to run apt upgrade manually — worth having on any internet-facing box, and cheap enough to just turn on for the home server too.
A few other things worth doing
- Don't reuse the same SSH key across unrelated systems you don't fully trust — if you're generating a new key for this project specifically, that's a reasonable boundary
- Keep both systems updated beyond just security patches —
sudo apt update && sudo apt upgradeperiodically, since unattended-upgrades only covers security-flagged packages by default, not every version bump - Don't run anything else on the VPS. It's serving a narrow purpose (WireGuard relay + one Postfix instance) — the more software running on an internet-facing box, the more surface area for something to go wrong. Resist the temptation to also host other things there
Setting up the WireGuard tunnel
This guide doesn't depend on pfSense or any particular router platform — plain wg-quick (WireGuard's standard command-line tooling) works identically on any Linux VM, container host, or router with WireGuard support. Build this before touching Mail-in-a-Box itself; everything downstream assumes the tunnel already exists.
Choosing where WireGuard runs on the home side
Three options, in order of how portable they are:
Option A — a dedicated lightweight VM. The most portable and reliable choice, and the one this guide assumes by default. A minimal Ubuntu 22.04 VM with almost no resources allocated is enough — it's just running a tunnel, not doing any real work.
Option B — a Docker container. Works on many hosts, but not on Synology's DSM — Synology's kernel doesn't ship the WireGuard kernel module, and a Docker container can't load a kernel module the host itself doesn't have. This is exactly why my own setup uses a VM instead of a container, despite DSM otherwise having solid Docker support. On hosts where the kernel module is present (most standard Linux distributions, some other NAS platforms), a container using an image like linuxserver/wireguard works fine and needs the NET_ADMIN capability granted. If you're on Synology specifically, skip this option and use the VM route instead.
Option C — directly on your router, if it supports WireGuard (pfSense, OPNsense, OpenWrt, Ubiquiti, GL.iNet, some ASUS firmware, and others do). Simplest option if available — no VM or container needed at all, just the router's own WireGuard client configuration screen. Instructions vary significantly by vendor; check your router's VPN or WireGuard settings for an "add tunnel" or "import config" option and adapt the config file below to paste in.
The steps below use Option A's plain wg-quick approach — the config file itself is identical regardless of which option you pick; only how you install and run it differs.
Step 1: Install WireGuard
On the VPS:
sudo apt update && sudo apt install wireguard
If you followed the "Securing both servers" section above, ufw allow 51820/udp is already in place — if you skipped ahead, add it now before continuing, or the tunnel handshake will silently fail with no obvious error.
On the home side (VM option):
sudo apt update && sudo apt install wireguard
On the home side (Docker option, if your hardware supports it):
services:
  wireguard:
    image: linuxserver/wireguard
    cap_add:
      - NET_ADMIN
      - SYS_MODULE
    environment:
      - PUID=1000
      - PGID=1000
    volumes:
      - ./config:/config
    ports:
      - 51820:51820/udp
    restart: unless-stopped
Step 2: Generate a keypair on each end
Run this on both the VPS and the home side — each needs its own keypair:
wg genkey | tee privatekey | wg pubkey > publickey
chmod 600 privatekey
This creates privatekey and publickey in the current directory, and locks down the private key's permissions (WireGuard will complain about an overly-open private key file, and it's good practice regardless). Keep the private key on the machine that generated it; the public key gets shared with the other side.
View each file to copy its contents into the config files in the next two steps:
cat privatekey
cat publickey
Step 3: Configure the VPS side
sudo nano /etc/wireguard/wg0.conf on the VPS:
[Interface]
PrivateKey = <VPS's private key>
Address = 10.10.10.1/30
ListenPort = 51820

[Peer]
PublicKey = <home side's public key>
AllowedIPs = 10.10.10.2/32
No Endpoint on the peer entry — the home side's address is dynamic (that's the whole reason this tunnel exists), so the VPS just listens and accepts a handshake from wherever the home side currently is.
Step 4: Configure the home side
sudo nano /etc/wireguard/wg0.conf on the home VM (or container/router config, adapted to the same values):
[Interface]
PrivateKey = <home side's private key>
Address = 10.10.10.2/30

[Peer]
PublicKey = <VPS's public key>
Endpoint = <VPS public IP>:51820
AllowedIPs = 10.10.10.0/30
PersistentKeepalive = 25
AllowedIPs here is deliberately narrow — just the tiny tunnel subnet, not 0.0.0.0/0. This tunnel exists to connect two specific hosts to each other, not to route all of either side's general internet traffic. PersistentKeepalive matters more here than in a lot of WireGuard setups — it keeps the NAT mapping alive on the home side's router, so the VPS can still reach in with forwarded inbound mail traffic between home-initiated packets, despite the home connection likely sitting behind CGNAT or a regular NAT.
Step 5: Enable and start the tunnel, both ends
sudo systemctl enable wg-quick@wg0
sudo systemctl start wg-quick@wg0
Step 6: Verify the tunnel is actually up
sudo wg show
Should show a recent handshake on both ends. Then confirm the tunnel addresses can reach each other:
# from the home side
ping 10.10.10.1

# from the VPS
ping 10.10.10.2
Step 7: Enable forwarding and DNAT on the VPS
The tunnel alone doesn't forward inbound mail traffic — the VPS needs IP forwarding enabled, DNAT rules sending inbound mail ports through the tunnel to the home side, and (since ufw is now the actual firewall on this box, per the hardening section above) all of that needs to be configured through ufw, not raw iptables added separately — mixing the two is exactly how rules quietly vanish on the next reboot.
Enable forwarding (/etc/sysctl.conf on the VPS):
net.ipv4.ip_forward=1
Apply immediately with sudo sysctl -p.
Find your VPS's public-facing interface name before writing the rules below — it isn't always eth0:
ip a
Look for the interface with your VPS's public IP assigned (common names: eth0, ens3, enp1s0 — varies by provider). Use that name in place of eth0 throughout.
Add the DNAT and MASQUERADE rules to ufw's own NAT table, rather than raw iptables:
sudo nano /etc/ufw/before.rules
Add this block at the very top of the file, before the existing *filter section:
*nat
:PREROUTING ACCEPT [0:0]
:POSTROUTING ACCEPT [0:0]

-A PREROUTING -i eth0 -p tcp --dport 25 -j DNAT --to-destination 10.10.10.2:25
-A PREROUTING -i eth0 -p tcp --dport 587 -j DNAT --to-destination 10.10.10.2:587
-A PREROUTING -i eth0 -p tcp --dport 993 -j DNAT --to-destination 10.10.10.2:993
-A PREROUTING -i eth0 -p tcp --dport 53 -j DNAT --to-destination 10.10.10.2:53
-A PREROUTING -i eth0 -p udp --dport 53 -j DNAT --to-destination 10.10.10.2:53
-A PREROUTING -i eth0 -p tcp --dport 80 -j DNAT --to-destination 10.10.10.2:80
-A PREROUTING -i eth0 -p tcp --dport 443 -j DNAT --to-destination 10.10.10.2:443
-A POSTROUTING -o wg0 -d 10.10.10.2 -j MASQUERADE

COMMIT
Mail-in-a-Box's own setup guide lists the complete port set — worth checking directly rather than assuming this list above is exhaustive for your exact configuration: 22 (SSH — not forwarded here, since SSH goes to the VPS itself, not the home server), 25 (SMTP), 53 (DNS, both TCP and UDP), 80 (HTTP), 443 (HTTPS), 465 (SMTP submission, legacy clients), 993 (IMAP), 995 (POP), and 4190 (Sieve mail filtering). This guide's rules above cover the ones needed for the setup as built here; add DNAT lines for 465, 995, or 4190 the same way if you use POP or Sieve filtering.
Why 80 and 443 matter beyond "the website works": this isn't just serving a static landing page. Mail-in-a-Box's admin control panel, webmail (at /mail), and Nextcloud-based contacts/calendar/file sync (at /cloud) are all served over HTTPS from the same box — and port 80 isn't just an HTTP-to-HTTPS redirect, it's required for Let's Encrypt to renew your TLS certificates, which happens automatically and silently until it can't reach port 80 and your certificate quietly expires. Missing either port doesn't just break a webpage — it breaks certificate renewal, admin access, and webmail all at once.
Add a DNAT line for any other port Mail-in-a-Box needs forwarded beyond what's listed here (POP, Sieve, etc., per the full list above).
Why port 53 is in that list: Mail-in-a-Box runs its own authoritative DNS server, not just mail. If you're using Mail-in-a-Box's default setup — where your domain's nameservers point at the box itself via glue records (ns1.box.yourdomain.com, ns2.box.yourdomain.com), exactly as Mail-in-a-Box's own setup guide walks through — those glue records have to point at the VPS's public IP, the same as your MX record, for the same reason: it's the only stable, non-CGNAT'd address in this whole setup. But the DNS server software itself (nsd) runs on the home server, since that's where Mail-in-a-Box is actually installed. Without forwarding port 53, DNS queries for your domain would reach the VPS and have nowhere to go — your domain's own nameservers would be unreachable, which breaks far more than just mail (nothing resolving your domain at all). This isn't a separate mechanism from the mail forwarding you've already set up — it's the exact same DNAT/MASQUERADE pattern, just one more port.
Why the MASQUERADE line is required, not optional: DNAT alone only rewrites the destination address. Without it, the home server would try to reply directly to the original external client using its own regular internet connection, not back through the tunnel — the external client sees a reply from an IP it never contacted and drops it, so the connection fails despite the DNAT rule looking correct. MASQUERADE rewrites the source too, so the home server sees the connection as coming from the VPS's tunnel address (10.10.10.1) and naturally replies back through the tunnel; the VPS's connection tracking then correctly un-NATs that reply back to the real external client.
Explicitly allow this specific forwarded traffic through ufw's filter rules too — adding NAT translation rules doesn't automatically permit the traffic through ufw's own packet filtering:
sudo ufw route allow in on eth0 out on wg0 to 10.10.10.2 port 25 proto tcp
sudo ufw route allow in on eth0 out on wg0 to 10.10.10.2 port 587 proto tcp
sudo ufw route allow in on eth0 out on wg0 to 10.10.10.2 port 993 proto tcp
sudo ufw route allow in on eth0 out on wg0 to 10.10.10.2 port 53 proto tcp
sudo ufw route allow in on eth0 out on wg0 to 10.10.10.2 port 53 proto udp
sudo ufw route allow in on eth0 out on wg0 to 10.10.10.2 port 80 proto tcp
sudo ufw route allow in on eth0 out on wg0 to 10.10.10.2 port 443 proto tcp
Match these to whichever ports you added DNAT rules for above.
Restart ufw to apply everything, then enable it if you haven't yet:
sudo ufw disable && sudo ufw enable
(A disable/re-enable cycle, not just a reload, ensures the edited before.rules NAT block is actually picked up.)
Confirm the rules are active:
sudo ufw status verbose
You should see the WireGuard port, SSH, and all seven routed rules (mail, DNS, and web/admin) listed.
If you're using Mail-in-a-Box's default DNS setup (glue records pointing your domain's nameservers at the box itself), make sure the IP you enter for those glue records at your registrar is the VPS's public IP — same reasoning as the MX record. Mail-in-a-Box's own setup guide and admin panel walk through the glue record process itself; the forwarding above is what makes that actually reach the home server once queries arrive.
Step 8: Install and configure the outbound relay on the VPS
This is the piece that actually makes outbound mail work — the VPS needs its own lightweight Postfix instance to accept relayed mail from the home server and deliver it onward.
sudo apt install postfix
When prompted during install, choose "Internet Site" and enter the VPS's hostname when asked for the system mail name.
Restrict who can relay through it — this is the single most important line in this step. An unrestricted relay becomes an open spam relay within minutes of being discovered by scanners. Edit /etc/postfix/main.cf:
sudo nano /etc/postfix/main.cf
Find the mynetworks line and set it to only the tunnel subnet and localhost:
mynetworks = 127.0.0.0/8 [::1]/128 10.10.10.0/30
Also restrict which interface Postfix listens on — defense in depth beyond mynetworks alone. By default Postfix binds to all interfaces, including the VPS's public one, meaning it accepts connections from the internet and then rejects them based on mynetworks — better to not accept them there at all. In the same main.cf, set:
inet_interfaces = 10.10.10.1, 127.0.0.1
This makes Postfix only listen on the tunnel address and localhost — the public interface never sees it at all, regardless of firewall state.
Restart Postfix to apply both changes:
sudo systemctl restart postfix
Confirm it's listening only where expected:
sudo ss -tlnp | grep :25
Should show it bound to 10.10.10.1 and 127.0.0.1, not 0.0.0.0.
Add a ufw rule permitting the home server to reach this relay through the tunnel:
sudo ufw allow from 10.10.10.0/30 to any port 25 proto tcp
This doesn't conflict with the DNAT rules from Step 7 — those are scoped to traffic arriving on the VPS's public interface (-i eth0), while the home server's outbound relay connection arrives via the tunnel interface (wg0) instead, so it reaches this local Postfix process directly rather than getting redirected.
The tunnel and VPS-side relay are now fully set up. The remaining two steps — pointing Mail-in-a-Box's own Postfix at this relay, and verifying the whole path — depend on Mail-in-a-Box actually being installed first, so they're covered at the end of the next section instead of here.
Setup overview
Mail-in-a-Box installs from a single command on a fresh Ubuntu box:
curl -s https://mailinabox.email/setup.sh | sudo bash
Some purists don't like curl → bash commands — this is a fresh VM with nothing on it, it's safe to go with it.
Run this on the VPS first if you're using the relay pattern above, or directly on a home server with a static IP and unblocked port 25 if your ISP doesn't block it (worth checking before assuming you need the relay at all — not every residential ISP does). Any Ubuntu 22.04 LTS VM works — the NAS is just what happens to be running mine.
The installer handles TLS certificates, mail transfer agent configuration, spam filtering, webmail, and generates the exact DNS records your domain needs — the admin panel shows you precisely what to add at your DNS provider, including SPF, DKIM, and DMARC, rather than leaving you to look them up separately.
If running the VPS-relay pattern (with the WireGuard tunnel, VPS relay, and DNAT from the section above already built):
- Install Mail-in-a-Box on the home server as normal — this section covers the install itself
- The VPS-side outbound relay (Step 8) and inbound DNAT with the MASQUERADE hairpin fix (Step 7) are already done from the section above — nothing to redo here
- The VPS's IP is what appears in your domain's SPF record and reverse DNS, since it's the IP recipient servers actually see mail arrive from
- Two steps remain, covered right below: pointing Mail-in-a-Box's own Postfix at the relay, and verifying the whole path actually works
Step 9: Point the home server's Postfix at the relay
With Mail-in-a-Box now installed, tell its Postfix to send outbound mail through the VPS instead of attempting direct delivery (which the ISP's port-25 block would prevent anyway):
sudo nano /etc/postfix/main.cf
Add or edit the relayhost line:
relayhost = [10.10.10.1]:25
The brackets around the IP are required — they tell Postfix to treat this as a literal address rather than performing an MX lookup on it. Restart to apply:
sudo systemctl restart postfix
What survives a Mail-in-a-Box update, and what to check afterward. Mail-in-a-Box's update process re-runs its full setup scripts (the same curl | bash command used for the initial install), which resets every file Mail-in-a-Box actively manages back to its own defaults — worth knowing exactly what that covers rather than assuming either "nothing survives" or "everything survives."
On the VPS: nothing here is at risk at all. The VPS runs its own independently-installed Postfix (Step 8) and its own ufw configuration — Mail-in-a-Box is never installed there, so none of it is touched by a Mail-in-a-Box update. Every VPS-side customization is permanent unless you change it yourself.
On the home server: only relayhost is a customization Mail-in-a-Box doesn't already manage, and it should survive. Mail-in-a-Box's own setup source shows their install script explicitly setting a specific list of Postfix keys on every run — inet_interfaces, smtp_bind_address, myhostname, smtpd_banner, mydestination, and a few queue-timing settings — via a targeted key-by-key editor, not a full file rewrite. relayhost isn't in that list, so Mail-in-a-Box's own updater has no reason to touch it.
One thing Mail-in-a-Box does reset that sounds like a problem but isn't: inet_interfaces gets set back to all on every update, meaning the home server's Postfix listens on every local interface, not just the tunnel address. This doesn't undo the Step 8 hardening — that restriction matters on the VPS specifically because the VPS has a real public IP; the home server has no direct public IP in this architecture at all; it's only ever reached through the tunnel regardless of which interfaces its own Postfix is listening on locally.
What to actually check after a Mail-in-a-Box update:
- Confirm
relayhostis still set:sudo postconf relayhoston the home server should return[10.10.10.1]:25 - Send a real test email afterward (same process as Step 10) — a config check confirms the setting exists, not that mail is actually flowing
sshd_config,ufwrules, and the WireGuard tunnel itself are entirely outside Mail-in-a-Box's management on both boxes — none of it is touched by an update, ever
Step 10: Verify the full path end to end
- Send a test email from the Mail-in-a-Box account to an external address (Gmail, etc.)
- Watch the mail log on the home server while it sends:
sudo tail -f /var/log/mail.log
Confirm the message hands off to 10.10.10.1 (the VPS), not a direct delivery attempt
- Watch the same on the VPS to confirm it receives the relayed message and delivers it onward
- Send a test email to the Mail-in-a-Box address from an external account, and confirm it arrives — this exercises the inbound DNAT path from Step 7 separately from the outbound relay path from Steps 8–9, since a working outbound doesn't guarantee inbound is also correctly configured
- If using Mail-in-a-Box's own DNS, confirm the domain's nameserver is actually reachable from outside, not just that the tunnel shows a handshake — query it directly from a machine that isn't either server:
dig @your-vps-public-ip yourdomain.com SOA
A real answer confirms port 53 is correctly forwarding through to the home server's nsd; a timeout means the DNS forwarding rules from Step 7 aren't working, even if mail itself is fine — the two are independent checks
- Load the admin panel and webmail in a browser —
https://yourdomain.com/adminandhttps://yourdomain.com/mail— from a device that isn't on your home network (cellular data works well for this). This confirms ports 80 and 443 are correctly forwarding, and that Let's Encrypt was actually able to issue a valid certificate (a browser security warning here usually means port 80 wasn't reachable during certificate issuance, not a problem with the site itself)
Reputation and deliverability, practically
- Set SPF, DKIM, and DMARC correctly from day one — Mail-in-a-Box generates the records; you add them at your DNS provider. This is the single biggest lever on deliverability, more than IP age or sender volume
- Set reverse DNS (PTR) on the VPS to match your mail domain — most VPS providers let you set this in their control panel; mismatched or missing PTR is a common, avoidable deliverability hit
- Expect a warm-up period — the first stretch of sending to major providers may see occasional spam-folder delivery until the domain/IP build sending history. This resolves with consistent, legitimate sending, not with any special trick
- Check blacklist status occasionally, not just at setup — the same MXToolbox and Spamhaus checks from the pre-commit step above, run periodically once live, catch a problem early rather than leaving you wondering why replies stopped coming
FAQ: Self-Hosted Email
How do I SSH into the home server when I'm not on my home LAN?
This guide's ufw rules deliberately don't provide that — the home server's SSH is restricted to the LAN subnet, full stop. Opening port 2222 (or whatever you chose) to the internet to work around this reintroduces exactly the exposure the rest of this section is trying to avoid. Instead, set up a separate split-tunnel WireGuard admin connection (covered in the remote-access guide) — it gets you onto your home LAN generally, SSH included, without ever exposing SSH itself to the public internet.
Is changing the default SSH port actually a security measure?
Not a real one — it's obscurity, not access control, and won't slow down anyone specifically targeting your IP. What it does do is remove your server from the constant, automated background noise of bots scanning port 22 across the entire internet — far fewer log entries, far fewer Fail2ban bans triggered by opportunistic scanning rather than a real attempt. Worth doing for the practical noise reduction; don't treat it as a substitute for key-only auth and a proper firewall.
What ports does Mail-in-a-Box actually need, beyond just mail?
Per Mail-in-a-Box's own setup guide: 22, 25, 53 (TCP+UDP), 80, 443, 465, 993, 995, and 4190. This guide's Step 7 forwards the ones needed for the setup as built here (25, 587, 993, 53, 80, 443); add the rest (465, 995, 4190) the same way if you use POP or Sieve filtering. Missing 80 specifically breaks Let's Encrypt certificate renewal, not just the website — a subtler failure than it sounds, since it doesn't show up until the current certificate expires.
Will a Mail-in-a-Box update undo the relay setup?
The VPS side (Postfix relay, ufw, DNAT) is never touched — Mail-in-a-Box only runs on the home server. On the home server, the one setting this guide adds (relayhost) isn't among the Postfix keys Mail-in-a-Box's own setup script manages, confirmed directly from their setup source, so it should survive updates. Worth a quick sudo postconf relayhost check after updating regardless — cheap to verify, expensive to discover silently broken.
Does Mail-in-a-Box's built-in nameserver (glue records) work through the WireGuard tunnel?
Yes, using the exact same DNAT/MASQUERADE pattern as mail — port 53 (both TCP and UDP) just needs forwarding through the tunnel to the home server too, since that's where Mail-in-a-Box's DNS server (nsd) actually runs, even though the glue records at your registrar point at the VPS's public IP. Mail-in-a-Box's own guide covers setting up the glue records themselves; Step 7 above covers making sure queries to them actually reach the box once they arrive at the VPS.
Do I need Postfix running on the VPS, or just the WireGuard tunnel?
Both. The tunnel alone only moves packets between the two boxes — it doesn't understand SMTP. The VPS needs its own Postfix instance (Step 8) configured to accept relay connections only from the tunnel subnet and deliver outward; without it, there's nothing on the VPS to actually hand outbound mail to.
Why do I need a MASQUERADE rule if I already have DNAT set up?
DNAT only rewrites where a packet is going, not where it appears to come from. Without also rewriting the source (Step 7), the home server would try to reply directly to the original internet client using its own regular connection — the client sees an unexpected reply from an IP it never contacted and drops it. MASQUERADE makes the connection look, from the home server's side, like it came from the VPS itself, so the reply naturally routes back through the tunnel.
Why enable ufw instead of just using raw iptables throughout?
Either works technically, but mixing them is the actual problem — if ufw is active (which it should be, per the hardening section) and you also add rules with raw iptables directly, ufw doesn't know about those rules and can wipe or contradict them on reload or reboot. Configuring everything through ufw's own mechanisms (ufw allow, ufw route allow, and its before.rules file for NAT) keeps one consistent, persistent source of truth instead of two firewall systems fighting each other.
If the stock Mail-in-a-Box setup is secure, why bother with the home + relay version?
Two reasons. Security: a VPS provider can, in principle, snapshot the disk of a running VM, and mail is stored unencrypted at rest (standard for IMAP/webmail access to work at all) — a provider-level snapshot could expose plaintext mail regardless of TLS in transit. Running the actual mailbox on hardware you own removes that specific exposure, though it's a narrow concern most people don't need to worry about. Cost: since the relay VPS never stores mail, it can run on the cheapest tier a provider offers — the stock setup's single VPS needs to size up for storage and processing as mailbox count and mail volume grow, so it costs more over time by design, not because it's less efficiently run.
Why doesn't WireGuard work in a Docker container on Synology?
Synology's DSM kernel doesn't ship the WireGuard kernel module, and a container can't load a kernel module the underlying host doesn't have — this isn't a Docker limitation generally, just a Synology-specific gap. A lightweight dedicated VM sidesteps the issue entirely, which is why this guide defaults to that option. Other NAS platforms and most standard Linux hosts don't have this restriction.
Do I actually need the VPS, or can I just run everything at home?
Depends entirely on whether your specific ISP blocks outbound port 25 — some don't. Check first (a quick test send, or asking your ISP directly) before assuming you need the relay pattern.
Is Mail-in-a-Box the only option?
No — Mailcow and iRedMail are common alternatives with more granular control, at the cost of more moving parts to understand. Mail-in-a-Box's appeal is specifically the "one command, sane defaults, all-in-one admin panel" simplicity, which is why it's the one covered here.
What happens if the VPS goes down?
Both directions are affected, since the VPS is the public anchor for the whole domain — outbound mail queues and retries (standard SMTP behavior) until it's back, and inbound mail from other servers will also fail to connect until the VPS is reachable again, since that's where the MX record points. This is a real single point of failure worth knowing about, not a minor inconvenience — a cheap, reliable VPS provider matters more here than it might first appear.
Will major providers like Gmail actually accept mail from a small self-hosted server?
Yes, provided SPF/DKIM/DMARC are correctly configured and sending behavior is legitimate (no blast-sending, no open relay). Gmail and Outlook don't reject mail simply for coming from a small or self-hosted sender.
How much does the VPS relay cost?
A minimal VPS for this purpose is typically a few dollars a month — it's doing almost no work (just relaying outbound SMTP), so the cheapest tier from most providers is more than sufficient.
Related reading
- pfSense WireGuard IPv6 Setup: Full Tunnel and Split Tunnel Guide
- Multi-Site VPN on pfSense: Connect Multiple Locations with WireGuard
- DNS over TLS on pfSense: Encrypt Unbound's Upstream Queries
Recap
- WireGuard setup is pfSense-free — a plain VM, a Docker container (except on Synology, which lacks the kernel module), or WireGuard support built into some routers all work identically
- Create a real non-root user first, on both servers — root-only access is common on fresh VPS images and root login gets disabled shortly after
- Set up SSH key authentication and confirm it works, on both servers, before disabling password login anywhere — order matters to avoid locking yourself out
- Changing the default SSH port is obscurity, not real access control — but it cuts out most of the constant automated bot scanning, which is a genuine practical benefit even though it stops nothing targeted
- The home server's SSH is LAN-only by design, not internet-reachable at all — remote admin access needs a separate WireGuard admin tunnel, not a port opened to the world
- Deny-by-default
ufwon both servers, with only the specific ports actually needed explicitly allowed — the VPS's NAT/forwarding rules live inufw's own config (/etc/ufw/before.rulesplusufw route allow), not separate rawiptables - Fail2ban and unattended security updates are cheap to add and worth having on any internet-facing box
- The VPS needs its own Postfix relay (Step 8) and its own DNAT + MASQUERADE hairpin fix (Step 7) — a raw DNAT rule alone silently fails for real internet clients due to asymmetric return routing
- Postfix on the VPS is restricted two ways, not one —
mynetworkslimits who can relay, andinet_interfacesstops it from even listening on the public interface at all - Mail-in-a-Box's own DNS server (glue records,
ns1/ns2) needs port 53 forwarded through the tunnel too — same DNAT/MASQUERADE pattern as mail, easy to miss since it's a separate service from mail delivery even though both run on the same home server - Ports 80 and 443 need forwarding too, per Mail-in-a-Box's own port list — not just for the website, but because port 80 is required for Let's Encrypt certificate renewal, and 443 serves the admin panel, webmail, and Nextcloud, all from the same box
- A Mail-in-a-Box update never touches the VPS at all; on the home server,
relayhostisn't among the settings Mail-in-a-Box's own script manages, so it survives updates — confirmed from their actual setup source, not assumed - Most of self-hosted email's bad reputation is inherited secondhand, not from people who actually ran it recently
- Blacklisting follows sending behavior (missing auth, spam, open relays), not the fact of self-hosting itself
- Port 25 support varies by provider, not universal — Hetzner and OVH allow it by default, DigitalOcean and Vultr require a support ticket, AWS and Azure make it difficult-to-impossible; check before committing to a provider
- Mail-in-a-Box automates the parts that used to require hand-configuring several separate services
- The one real, specific hurdle is residential ISPs blocking outbound port 25 — not every ISP does this, check first
- Keeping the mailbox at home instead of on a VPS avoids a narrow but real exposure: mail is stored unencrypted at rest, and a cloud provider can in principle snapshot a VM's disk — not a flaw in the stock setup, just a threat model worth being honest about, primarily for nerds who read this blog post
- Since the relay VPS never stores mail, it can run on the cheapest tier available (Hetzner's smallest, in my case) — the stock setup's single VPS has to scale storage and processing with mailbox count, so it costs more over time by design
- Both directions route through the VPS — it's the stable public IP the domain's mail anchors to, not just an outbound relay; the VPS being down affects inbound and outbound alike
- Any Ubuntu 22.04 LTS-capable virtualization host works the same way — NAS, Proxmox, an old desktop, whatever's on hand
- Check the relay VPS's IP against MXToolbox and Spamhaus before committing — VPS providers reuse IPs, and a previous tenant's bad reputation can be inherited before you send a single message
- SPF, DKIM, and DMARC configured correctly matter more for deliverability than IP age or self-hosted status
- Expect a short reputation warm-up period with major providers, not a permanent deliverability penalty