pfSense WireGuard IPv6 Setup: Full Tunnel and Split Tunnel Guide
Setting up a home WireGuard VPN on pfSense gets you your own private, self-hosted VPN — no subscription, no third-party logging policy to trust, just your own router. This guide walks through a complete pfSense WireGuard setup with IPv6 covering both major connection modes (full tunnel and split tunnel), dual-stack IPv4 and IPv6 addressing, a stable hostname via Cloudflare Dynamic DNS, and the firewall/NAT rules that actually make traffic pass — not just handshake.
If you've only ever set up a single WireGuard peer and wondered why "connected" doesn't always mean "working," or why your VPN doesn't seem to carry IPv6, this guide covers both.
What you'll build:
- A dual-stack WireGuard tunnel on pfSense (IPv4 and IPv6, not just one)
- A stable
vpn.yourdomain.comhostname that survives IP changes, via Cloudflare DDNS - Two peer types per device — full tunnel (all traffic routed home) and split tunnel (only home traffic routed home) — and why you want both
- The exact firewall and NAT rules each mode needs, and which one you can skip
Architecture
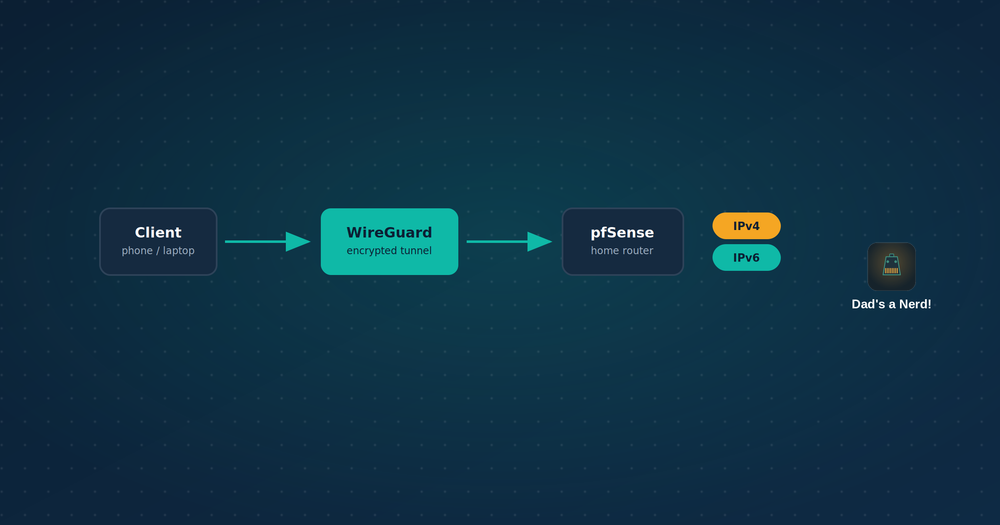
Before touching pfSense, here's the shape of what you're building:
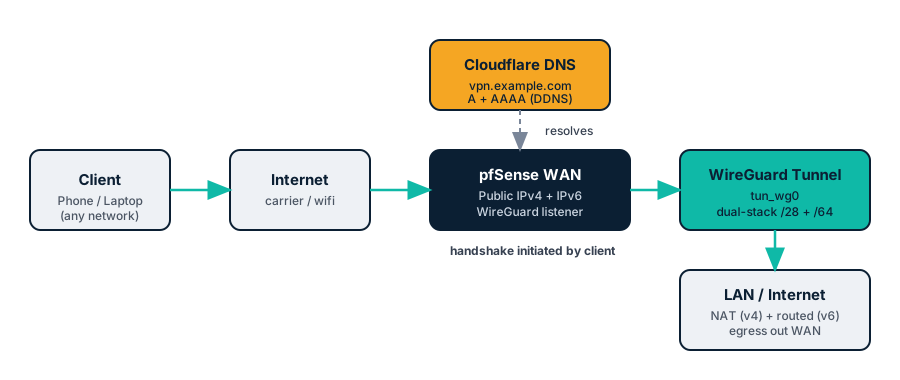
A client anywhere on the internet initiates a handshake to a hostname that always resolves to your home's current public IP (v4 and v6, kept current by DDNS). Once connected, pfSense decrypts the tunnel traffic and either NATs it (IPv4) or routes it natively (IPv6) out to the real internet — so from the outside, your phone's traffic looks like it's coming from home.
Full tunnel vs. split tunnel VPN — and why you want a peer for each
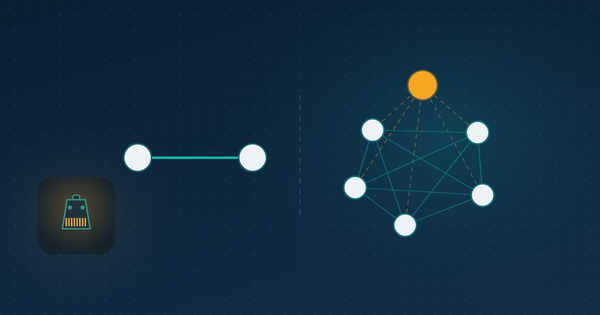
Both modes use the exact same pfSense tunnel and the exact same WireGuard protocol. The only thing that differs is one field in the client's config: AllowedIPs. Understanding this distinction is the single most useful thing you can know before wiring up a home WireGuard VPN.
| Split tunnel | Full tunnel | |
|---|---|---|
| AllowedIPs | Home subnets only (e.g. 10.10.10.0/28, 2601:db8:aaaa:bbbb::/64) |
Everything (0.0.0.0/0, ::/0) |
| Routes through home | Only traffic destined for your home network | All traffic — browsing, apps, everything |
| Client's own internet | Unaffected, goes out locally as normal | Also goes through home (uses your home's upload/download and public IP) |
| Good for | Reaching pfSense's GUI, a NAS, internal DNS, home automation — while traveling or on the go | Untrusted networks (hotel/airport wifi), getting IPv6 on a carrier that lacks it, wanting your home IP as your public identity |
| Bandwidth cost at home | Negligible | Every byte of the client's traffic now rides your home upload/download |
A concrete example: always-on access to a NAS without exposing it to the internet
A good real-world case for split tunnel: apps like Synology Photos and Synology Drive want to reach your NAS constantly in the background — syncing new photos the moment you take them, keeping files current — but you don't want your phone's entire internet connection routed home 24/7 just to make that possible. Full tunnel would work, but it's overkill: your phone's regular browsing, app traffic, and everything else would also ride your home connection for no reason, burning your home upload bandwidth and adding latency to traffic that has nothing to do with your NAS.
Split tunnel is the right fit here. Set the peer's AllowedIPs to just your NAS's address (or the whole LAN subnet if you want other services reachable too), and only Synology's traffic — plus anything else destined for home — goes through the tunnel. Everything else stays on the phone's normal connection, full speed, no detour.
The security angle this replaces: the alternative most people reach for is port-forwarding 5000/5001 (or QuickConnect) straight to the NAS on the router, so Synology's apps can reach it from anywhere. That means the NAS's login page is sitting on the open internet, reachable by anyone who finds the port — a constant target for credential stuffing and scanning, regardless of how strong your NAS password is. WireGuard split tunnel gets you the same "reachable from anywhere" outcome without opening a single inbound port to the NAS itself: the only thing exposed to the internet is the WireGuard listener port on pfSense (Step 5's WAN rule), which does nothing without a valid peer key. No handshake, no response, no attack surface to speak of — a portscan against it looks identical to a closed port. The NAS stays completely dark to anyone without a peer already provisioned.
Why separate peers rather than one config you edit back and forth: each WireGuard peer entry is just a keypair plus an AllowedIPs scope — creating a second peer costs nothing and means:
- You're not hand-editing
AllowedIPsand re-importing a config every time you switch modes (error-prone, and easy to forget on a phone). - Both peers can be active at once with different key material, so you can measure which one a given connection actually used.
- If one peer's key is ever compromised (e.g. a split-tunnel config on a device you lend to someone), you revoke only that peer — the full-tunnel peer on your primary phone is untouched.
- Some devices genuinely want both, situationally — e.g. a laptop that uses split tunnel at a coffee shop to reach the home NAS, but full tunnel on hotel wifi you don't trust. Two peers means two entries in your WireGuard app you can toggle between, not one config you retype.
The rest of this guide builds one pfSense tunnel with two peers — phone-split and phone-full — so you can see exactly where the two diverge.
Prerequisites for a pfSense WireGuard setup
- pfSense with the WireGuard package installed
- A WAN connection with a public IPv4 address (static or dynamic — dynamic is fine, DDNS handles it) and, ideally, a delegated IPv6 prefix from your ISP via DHCPv6-PD
- A domain you control in Cloudflare, or willingness to use a free dynamic DNS provider instead
- 15–20 minutes
Step 1: Create the WireGuard tunnel
VPN > WireGuard > Tunnels > Add Tunnel
- Description: something identifiable, e.g.
wg0 - Listen Port: pick something in the high range, e.g.
51820(WireGuard's convention) — avoid well-known ports unless you have a specific reason (see the carrier gotcha below) - Interface Keys: click generate — pfSense creates the server's own keypair
Leave the Address Configuration section for now; you'll fill in the tunnel subnet next.
Step 2: Assign a dual-stack tunnel subnet
Pick a dedicated IPv4 range and IPv6 /64 for this tunnel — but size the IPv4 side to how many peers you'll actually have, not a reflexive /24.
Why scope the IPv4 range down instead of using a /24
Most WireGuard walkthroughs (including earlier drafts of this one) default to a /24 out of habit — 254 usable addresses for a tunnel that might have two or three peers on it. That's needlessly oversized, and it costs you more than it looks like:
- Bigger blast radius if a peer key leaks. Firewall rules and NAT are usually written against the whole tunnel subnet, not individual /32s, for convenience. A /24 means any address in that huge range is implicitly trusted by those broad rules — a /28 shrinks the range those rules actually need to trust.
- Sloppy AllowedIPs hygiene becomes tempting. With 254 addresses free, it's easy to get lazy and widen a peer's AllowedIPs "just in case" instead of scoping it to a single /32. A visibly small subnet makes over-provisioning obvious at a glance.
- No actual benefit. Unlike IPv4 LAN space, you don't need headroom for DHCP leases or growth here — every peer gets a manually assigned static address anyway. A /24 doesn't make adding a tenth peer any easier than a /28 does.
- Easier auditing.
Status > WireGuardand your firewall logs are simpler to read when the whole tunnel fits in a range you can hold in your head —10.10.10.1–10.10.10.14is obviously "the tunnel," where10.10.10.1–10.10.10.254isn't meaningfully more informative.
A /28 gives you 14 usable addresses (pfSense + 13 peers) — plenty of headroom for a home setup, small enough to reason about at a glance. If you're planning a genuinely large peer count (a small business, a lot of IoT-style always-on peers), size up to a /27 or /26 deliberately — the point isn't "always use /28," it's pick the smallest range that comfortably fits your actual peer count plus room to grow, not the largest one pfSense will let you type in.
Sizing examples: how many addresses do you actually need?
The number that matters isn't "how many devices," it's "how many peers" — and if you're following the full-tunnel/split-tunnel pattern from earlier, most devices need two peers, not one (one for split, one for full). Size around that, not around your device count alone.
| Devices | Example | Peers needed (2 per device) | Recommended IPv4 range | Usable IPv4 addresses | IPv6 range |
|---|---|---|---|---|---|
| 1 | Just your phone | 2 (phone-split, phone-full) | /29 |
6 (pfSense + 5 peers) | /64 |
| 2 | Phone + laptop | 4 | /29 (tight) or /28 (comfortable) |
6 or 14 | /64 |
| 3–5 | iPhone, iPad, MacBook, home PC, maybe a spare | 6–10 | /28 |
14 (pfSense + 13 peers) | /64 |
The IPv6 column doesn't change regardless of peer count — that's the point of the section right before this one. A single /64 has 18 quintillion addresses; whether you have 2 peers or 200, you're using a vanishingly small fraction either way, so there's no equivalent sizing decision to make on the IPv6 side. Don't reach for a /112 or similar "right-sized" IPv6 block by analogy with the IPv4 table above — it looks tidy but breaks SLAAC and other tooling that assumes a /64 boundary, for no real benefit.
A single-device /29 looks tiny, but it's deliberate — you can always grow it (next section) rather than guessing high up front and giving broad rules more room than they need. If you know from the start you'll eventually cover a full household of devices each with a split/full pair, it's reasonable to just start at /28 rather than resizing twice.
Growing the range later without renumbering existing peers
The trick to a painless resize is picking your expansion to be CIDR-aligned with what you already have, so existing peer addresses don't need to change — only the prefix length does.
A /29 starting at 10.10.10.0 expands cleanly into a /28 at the same base (10.10.10.0/28), because 10.10.10.0/29 is exactly the lower half of that /28. Every existing peer address (10.10.10.2, .3, and so on) is still valid and still yours — you're just widening the boundary around them. This only works if your original range started at a properly aligned network boundary (which it will, if pfSense generated it or you followed the examples above) — you can't cleanly expand a range that starts mid-block.
To resize:
- VPN > WireGuard > Tunnels, edit the tunnel, change the prefix length on the IPv4 address (e.g.
10.10.10.1/29→10.10.10.1/28). Save. - Update anywhere the old prefix length is referenced literally — this is the part that's easy to miss:
- Firewall > NAT > Outbound, if you're on Manual mode (Step 6)
- Any split-tunnel client config's
AllowedIPs— split-tunnel peers reference the whole subnet (10.10.10.0/29), so that literal needs updating to10.10.10.0/28on every split-tunnel client. Full-tunnel peers are unaffected, since0.0.0.0/0already covers any size subnet.
- Add new peers at the next free address in the newly available range (
.6onward, in this example) — same process as Step 4, no changes needed to peers that already existed.
Tip for future-you: if you create a Firewall Alias (Firewall > Aliases) for the tunnel subnet instead of typing the literal CIDR into each rule, a resize becomes a single edit — update the alias definition once, and every rule referencing it picks up the change automatically. Worth doing even on a small home setup, since it costs nothing now and saves a hunt-through-every-rule later.
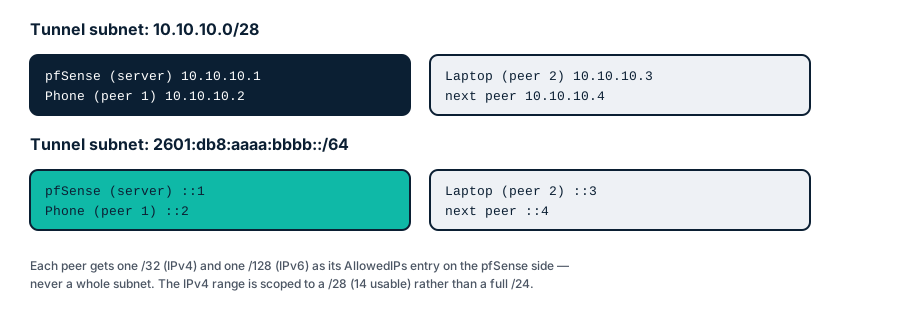
On the tunnel's Address Configuration:
10.10.10.1/28
2601:db8:aaaa:bbbb::1/64
Why the IPv6 side stays a /64
IPv6 doesn't get the same treatment — /64 is the practical floor, not a generous default. SLAAC and a number of IPv6 tooling assumptions are built around the last 64 bits being the host portion; going smaller than /64 breaks things in ways that aren't worth the address-space savings you'd get, especially when your delegated prefix almost certainly has /64s to spare (see the subnetting post linked below). The "scope it down" principle from the IPv4 side doesn't carry over here — leave the IPv6 tunnel subnet at /64.
(Replace the IPv6 block with a /64 carved out of your own delegated prefix — see our companion post on IPv6 subnetting and CIDR reference if you haven't split up your delegation yet.)
Then assign this tunnel as an interface: Interfaces > Assignments, add it, name it something like WG_FULLTUNNEL, and enable it.
Step 3: Set up Cloudflare Dynamic DNS
Your WAN address — especially the IPv6 one, which is often a dynamic DHCPv6 lease rather than a static assignment — will change. A dynamic DNS hostname means your client configs never need to be touched again.
- In Cloudflare, create a scoped API token: Zone > DNS > Edit, restricted to your zone.
- Pre-create placeholder A and AAAA records for your chosen hostname (e.g.
vpn.example.com). Set proxy status to DNS only (grey cloud) — Cloudflare's orange-cloud proxy only handles HTTP(S), and will silently break WireGuard's UDP traffic. - In pfSense: Services > Dynamic DNS > Dynamic DNS Clients > Add — you need two separate entries, one per address family. pfSense's Service Type dropdown has distinct Cloudflare and Cloudflare V6 options; each entry only updates one record type, so a single entry won't cover both A and AAAA.
Entry 1 — IPv4
- Service Type:
Cloudflare - Interface: WAN
- Hostname:
vpn.example.com - Zone ID + API Token from step 1
Entry 2 — IPv6
- Service Type:
Cloudflare V6 - Interface: WAN
- Hostname:
vpn.example.com(same hostname as entry 1) - Zone ID + API Token from step 1 (same token works for both)
Save both, then Force Update on each to push the first records immediately.
Confirm both records resolve correctly before moving on — it's easy to set up the IPv4 entry, see it working, and forget the second one entirely, which leaves the AAAA record stale even though everything looks fine on the IPv4 side.
Step 4: Add two peers — one split, one full
Same process both times; the only thing that changes between them is the description and, later, the client-side AllowedIPs. The pfSense-side Allowed IPs for a peer is always just that peer's own tunnel address (a single /32 and /128) — it identifies the peer, it doesn't set tunnel mode. Tunnel mode lives entirely in the client config in Step 7.
VPN > WireGuard > Peers > Add (do this twice)
- Tunnel: the one you created in Step 1
- Description:
phone-splitfor the first,phone-fullfor the second - Dynamic Endpoint: checked on both — mobile clients move between networks and change source IPs constantly; this lets pfSense accept a handshake from wherever the client currently is, rather than requiring a fixed source
- Public Key: pfSense doesn't generate the peer's keypair for you — generate one per peer:
wg genkey | tee phone-split_private.key | wg pubkey > phone-split_public.key
wg genkey | tee phone-full_private.key | wg pubkey > phone-full_public.key
Paste each peer's public key into its own Public Key field. Never reuse a keypair across peers — that defeats the point of having separate ones.
- Allowed IPs — a unique address per peer, same subnet, next available host:
# phone-split
10.10.10.2/32
2601:db8:aaaa:bbbb::2/128

# phone-full
10.10.10.3/32
2601:db8:aaaa:bbbb::3/128
Save both. Repeat this pattern for any additional device (laptop-split, laptop-full, etc.), incrementing the last octet/hextet each time.
Step 5: Firewall rules
Two separate places need rules — easy to do one and forget the other.
Firewall > Rules > WAN — allow the handshake in from the internet:
- Protocol: UDP, both IPv4 and IPv6 variants
- Destination: This Firewall (self)
- Destination port: your listen port (e.g. 51820)
Firewall > Rules > WG_FULLTUNNEL — allow the decrypted tunnel traffic to actually go somewhere:
- A permissive rule allowing the tunnel subnet (source) to reach any destination, both protocols
Without the second rule, the handshake will succeed but no traffic will pass — a common point of confusion, since "connected" and "working" aren't the same thing here.
Step 6: IPv6 routing (and a note on IPv4 NAT you probably don't need)
This is the piece that's easy to get wrong — but less because it needs extra config, and more because it's easy to add config that isn't necessary.
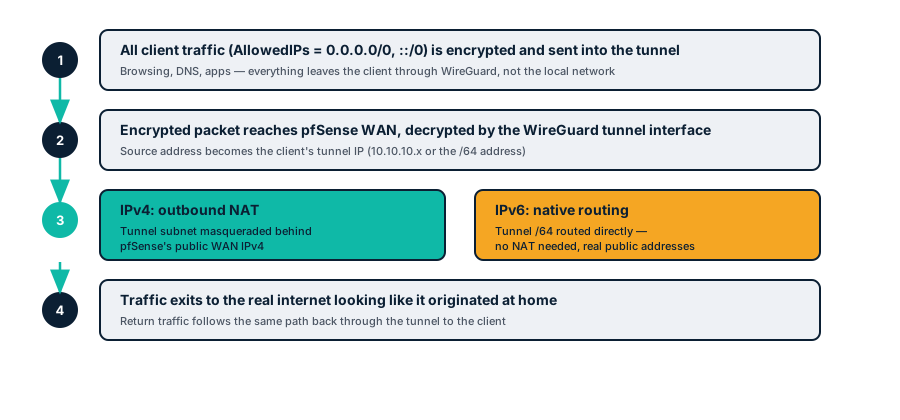
IPv4 — already handled, if you assigned the tunnel as an interface:
Because Step 2 has you assign the tunnel (WG_FULLTUNNEL), pfSense's default Automatic outbound NAT mode already generates a NAT rule for that subnet the moment it's assigned — the same way it does for LAN. Nothing to add. You only need to touch Firewall > NAT > Outbound manually if you've already switched the firewall to Manual mode for other reasons (common on more heavily customized setups) — in that case, add a rule NATing 10.10.10.0/28 to the WAN interface address, mirroring whatever your other subnets already do. If you're still on Automatic, leave it alone; adding a redundant manual rule under Hybrid mode is a common source of confusing double-NAT bugs later.
IPv6 — no NAT, ever, just routing + firewall passage:
IPv6 doesn't use NAT the way IPv4 does. As long as your tunnel's /64 is a real routable piece of your delegated prefix, and your WAN interface rules permit outbound traffic from that /64, packets route natively — pfSense just needs to know the tunnel subnet exists (which it does, from Step 2) and to allow it out (from Step 5). Confirm your WAN outbound firewall rules aren't scoped narrowly enough to exclude the tunnel's IPv6 block — this is the most common thing that silently breaks IPv6-over-the-tunnel while IPv4 works fine.
Step 7: Build the client configs
Both configs share the same Endpoint and DNS settings — the entire difference is the AllowedIPs line under [Peer], and naturally, each uses its own peer's keys and tunnel address from Step 4.
phone-split.conf — only home-bound traffic uses the tunnel:
[Interface]
PrivateKey = <phone-split's private key>
Address = 10.10.10.2/28, 2601:db8:aaaa:bbbb::2/128
DNS = 10.10.10.1, 2601:db8:aaaa:bbbb::1

[Peer]
PublicKey = <pfSense tunnel public key>
Endpoint = vpn.example.com:51820
AllowedIPs = 10.10.10.0/28, 2601:db8:aaaa:bbbb::/64
PersistentKeepalive = 25
phone-full.conf — everything routes through home:
[Interface]
PrivateKey = <phone-full's private key>
Address = 10.10.10.3/28, 2601:db8:aaaa:bbbb::3/128
DNS = 10.10.10.1, 2601:db8:aaaa:bbbb::1

[Peer]
PublicKey = <pfSense tunnel public key>
Endpoint = vpn.example.com:51820
AllowedIPs = 0.0.0.0/0, ::/0
PersistentKeepalive = 25
0.0.0.0/0, ::/0 on the full config is what routes every destination into the tunnel, not just the home subnet — that one line is the entire distinction between the two modes. PublicKey and Endpoint under [Peer] are identical in both, since they both connect to the same pfSense tunnel; only the client's own identity (PrivateKey, Address) and the scope of what it routes (AllowedIPs) differ.
Import both into the WireGuard app as separate tunnels (most apps let you name them — Home (Split) / Home (Full)) and toggle between them depending on the network you're on.
Pointing DNS at pfSense's own address (rather than your ISP's resolvers) on both configs means DNS queries get resolved by pfSense's Unbound resolver — useful if you run any ad-blocking or local hostname resolution. On the split config this only affects DNS for home-scoped lookups if your client is smart about split-DNS; many clients send all DNS queries to whatever's configured regardless of AllowedIPs, so check your app's behavior if that matters to you.
Step 8: Test it properly
Don't just check for a green "connected" indicator — confirm it's actually doing what you think:
- Handshake:
Status > WireGuardon pfSense should show a recent "Latest Handshake" for the peer - IP leak check: from the client, visit an IP-checking site — it should show your home's public IP, not the client's actual network
- DNS leak check: use a DNS leak test site — queries should resolve through your home resolver, not the client network's DNS
- Dual-stack check: an IPv6-aware test site should confirm you're getting a real IPv6 address from your home's delegation, not falling back to IPv4-only
A carrier gotcha worth knowing about
If IPv6 refuses to handshake at all over cellular, don't assume it's a pfSense or firewall problem before checking one thing: does your phone actually have a native IPv6 address on the cellular interface right now? Plenty of carriers — especially smaller MVNOs — are still IPv4-only with CGNAT, full stop. No amount of pfSense tuning fixes that; the fix is testing over a connection that actually has IPv6 (home wifi is the easiest baseline), or accepting an IPv4 Endpoint. A network diagnostic app that shows per-interface IP assignment (rather than just "am I online") will tell you in seconds which situation you're in.
The same CGNAT problem applies to your home side, not just the client's. If your ISP puts your WAN behind CGNAT, there's no public endpoint to point an Endpoint at and no port to forward — the setup in this guide can't work at all. That's the case where an overlay VPN with NAT traversal earns its keep: Tailscale vs. WireGuard on pfSense covers the tradeoff, including why exit-node performance on pfSense specifically is worse than you'd expect.
FAQ: pfSense WireGuard IPv6 Setup
Is WireGuard better than OpenVPN for a home VPN on pfSense?
For most home setups, yes — WireGuard is faster (simpler cryptography, kernel-level implementation on many platforms), uses far less config to get right, and reconnects almost instantly when a client changes networks. OpenVPN still has an edge in some corporate/legacy-compatibility scenarios, but for a personal pfSense VPN, WireGuard is the easier and faster choice.
Do I need a static IP to run a WireGuard VPN at home?
No. A dynamic IP works fine as long as you pair it with dynamic DNS (Step 3 above) — pfSense keeps a hostname pointed at your current address on both IPv4 and IPv6, so your client configs never need manual updates.
Does WireGuard support IPv6?
Yes, natively — WireGuard doesn't care which protocol version rides inside the tunnel. The Endpoint (how the client finds your router) and the AllowedIPs (what traffic goes through the tunnel) can each independently be IPv4, IPv6, or both, which is what the dual-stack setup in this guide is built around.
What's the difference between full tunnel and split tunnel in WireGuard?
Full tunnel routes all of a device's traffic through the VPN (AllowedIPs = 0.0.0.0/0, ::/0); split tunnel only routes traffic destined for your home network (AllowedIPs scoped to your home subnets). See the comparison table above for when to use each.
WireGuard handshake successful but no traffic passes on pfSense — why?
Almost always a missing firewall rule on the tunnel's own interface (not just WAN) — see Step 5. A successful handshake only proves the two ends can talk; it doesn't mean pfSense's firewall is letting the decrypted traffic go anywhere. This is the single most common "it says connected but nothing works" issue on pfSense's WireGuard package.
Related reading
- IPv6 subnetting and CIDR reference — carve out the /64 this guide uses for the tunnel
- Tailscale vs. WireGuard on pfSense — when an overlay VPN is the better answer, and what you give up on FreeBSD
Recap
- Dual-stack tunnel subnet: an IPv4 range sized to your peer count (a /28 comfortably fits most home setups), one /64 for IPv6 — pfSense always gets
.1/::1 - Scope the IPv4 tunnel range down deliberately — a /24 out of habit trusts a much bigger range than your firewall rules actually need to
- One peer per device per mode —
phone-splitandphone-fullare separate keypairs, separate config files, same tunnel - pfSense-side
Allowed IPson a peer is always just that peer's own address — tunnel mode is decided entirely by the client'sAllowedIPs - Dynamic DNS keeps the Endpoint stable through IP changes on either protocol
- Firewall rules are needed in two places: WAN (for the handshake) and the tunnel interface (for the traffic)
- Full tunnel needs a real outbound path: IPv4 is covered automatically by pfSense's default NAT mode once the tunnel is an assigned interface; IPv6 just needs the WAN rules to not exclude the tunnel's /64
AllowedIPs = 0.0.0.0/0, ::/0on a client config is what makes that specific peer full tunnel, not any pfSense-side setting
Once it's up, every device you carry gets your home network's IPv6 connectivity for free when running full tunnel — handy if, like a lot of mobile carriers, yours doesn't hand out native IPv6 at all.